Published originally on Medium (opens new window)
Recently I wrote an article on how (not) to connect your PS4 DualShock to your web applications. After finding out about the Gamepad API, I finally could try to control my music software, with a PS4 DualShock. I’ve used the Web MIDI API and the Web Gamepad API to make this happen. Why? Just because we can.
If you just want to see a working example, scroll down to the bottom to check out the final video.
If you don’t have a PS4 DualShock, you can just check out the videos below where I showcase the working examples. In case you don’t have Traktor, you can use free software to monitor if proper MIDI events are being sent instead of using Traktor, read further for more information.
# The Goal
My goal is to control my DJ software, being Traktor, from the browser controls or using my PS4 DualShock, but still using the browser as the main hub. You might ask, “why to use the browser instead of writing native code?”. Reason being, I wanted to discover and explore the modern browser APIs.
# The Strategy
Music instruments and music software (e.g. software for producing or DJs) use a technology which is called MIDI, which stands for “Music Instrument Digital Interface”. This universal digital interface allows music instruments (e.g. synthesizer) to communicate with other instruments, controllers or software.
Conveniently, modern browsers (I’ll be using Chrome v74+), although still an experimental, implement the MIDI API (opens new window). Meaning, from within the browser we can act as a controller that “receives” and “sends” MIDI messages. This means that a web application can communicate with, for example, DJ Software which is running on the same machine as the client that has the web application running in the browser.
In addition to the possibility to communicate with Traktor (DJ software) from the browser, we can also use the Gamepad API to communicate with any gamepad, but I’ll be using a PS4 DualShock connected by a USB cable (sorry, no Bluetooth support!).
The web application which runs in the browser will be the central hub that will read the user actions on the gamepad and translates this in MIDI communication that we send to our DJ Software.
# About MIDI
When we want to communicate over MIDI, we need to understand how the protocol works. The MIDI specification defines the hardware connectors, but also the contract of the data that we sent over the MIDI connectors. I’ll skip the hardware part, as we won’t need that knowledge (More info (opens new window)).
MIDI communication happens through “MIDI Messages”. A Midi Message (usually) exists out of 1, 2, or 3 bytes. The first byte is always a “Status”-byte and the following 2 or 3 bytes are known as “data bytes”. The status byte its MSB (opens new window) is always “1” and a data byte its MSB is always “0”. Which means, the value of a status byte will be always between 128 and 255, while the value of a data byte will be always between 0 and 127. Based on this knowledge, when seeing a MIDI byte, we can immediately determine if we have a status or data byte.
A status byte usually maps to a specific “function”, while the data bytes provide corresponding data. For example, we get a status byte which translates to “change track”, then the following data byte should contain the track #. You can find the entire mapping of what each status byte means and corresponding data bytes over here (opens new window) and here (opens new window).
No need to learn or know all the nitty-gritty details, but I created a small debugger (opens new window) which helps you to understand any MIDI message you might stumble upon.
# The Scope
As we’re introducing a lot of new stuff like MIDI, MIDI API, Gamepad API, I’ll keep the scope of our final version very small. I have the following requirements:
- We can control the volume of one “deck” with a slider in the web browser.
- We can play/pause the music of one “deck” with a single button in the web browser.
- We can control the volume of one “deck” with two buttons on the gamepad.
- We can play/pause the music of one “deck” with a single button on the gamepad.
In Traktor, the DJ software that I will be using for this, a “deck” is like a single channel, like a CD player or turntable that can play one track at a time. Usually, you have 2 or more decks in a music software as you can then mix and blend multiple channels/tracks.
# The Implementation
We’ll skip the part of creating a fancy GUI, as this would draw us away from the core challenge, have a look at the source code of WebApiStudio.com (opens new window) if you want to see how I implemented things in VueJs.
# Requirement 1: Control volume of one deck with a slider
We start off with creating a simple slider on an HTML page. We set the min value to 0 and max value to 127. Remember that our “data” bytes have a range of 0 to 127. Therefore we want our volume slider to limit its range for convenience.
<html>
<body>

<label for="volume">Volume:</label>
<input name="volume" type="range" id="volume" min="0" max="127">

<script>
    const volumeSlider = document.getElementById('volume');
    volumeSlider.addEventListener('input', function (e) {
        console.log(e.target.value)
    })
</script>

</body>
</html>
2
3
4
5
6
7
8
9
10
11
12
13
14
15
We are now just listening to the input event of the slider. Making sure that when we slide the slider from left to right that our min is 0 and max 127 .
Now we want to send a MIDI Message to an actual MIDI “output”. The “output” we use to send MIDI Messages to, the “Input” we use to receive MIDI messages from. You can have always multiple input and outputs available.
If you don’t have Traktor (opens new window) installed, I suggest you install a MIDI Monitor (opens new window) which can act as a “fake” output to listen to received MIDI messages, ideal for debugging purposes. If you use the MIDI Monitor, make sure that you enable “Act as destination for other programs” once you launched it.
If you are using Traktor, we need to first do some prep work.
- Start Traktor
- Open
settings>Controller Manager> SelectGeneric MIDIas device. - If you don’t have
Generic MIDIavailable, click theaddbutton and chooseGeneric MIDI. - Select for
in-portthe valuetraktor virtual input - Click
add in>mixer>volume adjust. - In the
device mapping, click on then/adropdown and selectch01 — CC — 006. - In the
mapping detailschoosedeck afor theassignment - You can see all the steps in this video (opens new window).
Now that Traktor is ready to listen to our MIDI mapping, we can tie things together.
<!DOCTYPE html>
<html>
<body>

<label for="volume">Volume:</label>
<input name="volume" type="range" id="volume" min="0" max="127">

<script>
    const volumeSlider = document.getElementById('volume');

    volumeSlider.addEventListener('input', async function (e) {
        const midiAccess = await navigator.requestMIDIAccess();

        // If you use "MIDI Monitor" use as name "'MIDI Monitor (Untitled)'"
        // If you use Traktor use as name "Traktor Virtual Input"
        const midiOutputName = 'Traktor Virtual Input';

        const output = getMidiOutputByName(midiAccess.outputs, midiOutputName);
        if (output) {
            const midiMessage = [176, 6, Number(e.target.value)];
            output.send(midiMessage);
            console.log(`Sent ${midiMessage} to ${output.name}`);
        } else {
            console.log('No MIDI Output found');
        }
    });

    function getMidiOutputByName(outputs, name) {
        for (const output of outputs.values()) {
            if (output.name === name) {
                return output;
            }
        }
        return null;
    }
</script>

</body>
</html>
2
3
4
5
6
7
8
9
10
11
12
13
14
15
16
17
18
19
20
21
22
23
24
25
26
27
28
29
30
31
32
33
34
35
36
37
38
39
When we now move the slider around, we will send a midi message of 3 bytes ([176, 6, currentSliderValue]) to our Traktor output (which annoyingly has the name “input” in it). We could optimize the code so we only fetch the outputs once, but these are improvements that I don’t want to focus on for now.
If we would run this page now, with Traktor (or MIDI Monitor) running in the background with the proper configuration we should get the following result:
As you can see, when I move the slider in the web page, the volume slider of my deck a changes accordingly. Sadly, when I load the page, with this code snippet I cannot query the “current” state of the volume slider in Traktor. Fixing this is out of our scope.
# Requirement 2: Add Play/Resume button
We will add now a simple button that will pause or resume our loaded track in deck a . Again, if you are using Traktor, we need to configure a new MIDI mapping in our Traktor controller manager.
- Open
settings>Controller Manager> SelectGeneric MIDIas device. - Click
add in>deck common>play/pause. - In the
device mapping, click on then/adropdown and selectch01 — CC — 007. Also, set the interaction mode to toggle. This way we toggle betweenplayandpausebasically. - In the
mapping detailschoosedeck afor theassignment - You can see all the steps in this video (opens new window).
I have refactored the code a bit to avoid duplication, but basically, I just added a button that will send the correct MIDI Message that maps to our play/pause action.
<!DOCTYPE html>
<html>
<body>

<label for="volume">Volume:</label>
<input name="volume" type="range" id="volume" min="0" max="127">
<button id="play">Play/Pause</button>

<script>

    // Attach Event Listener for the volume slider
    const volumeSlider = document.getElementById('volume');
    volumeSlider.addEventListener('input', async function (e) {
        const output = await getMidiOutput();
        if (output) {
            const midiMessage = [176, 6, Number(e.target.value)];
            output.send(midiMessage);
            console.log(`Sent ${midiMessage} to ${output.name}`);
        } else {
            console.log('No MIDI Output found');
        }
    });

    // Attach Event Listener for the play/pause button
    const playBtn = document.getElementById('play');
    playBtn.addEventListener('click', async function () {
        const output = await getMidiOutput();
        if (output) {
            const midiMessage = [176, 7, 127];
            output.send(midiMessage);
            console.log(`Sent ${midiMessage} to ${output.name}`);
        } else {
            console.log('No MIDI Output found');
        }
    });

    async function getMidiOutput() {
        // If you use "MIDI Monitor" use as name "'MIDI Monitor (Untitled)'"
        // If you use Traktor use as name "Traktor Virtual Input"
        const midiOutputName = 'Traktor Virtual Input';

        const midiAccess = await navigator.requestMIDIAccess();
        for (const output of midiAccess.outputs.values()) {
            if (output.name === midiOutputName) {
                return output;
            }
        }
        return null;
    }

</script>

</body>
</html>
2
3
4
5
6
7
8
9
10
11
12
13
14
15
16
17
18
19
20
21
22
23
24
25
26
27
28
29
30
31
32
33
34
35
36
37
38
39
40
41
42
43
44
45
46
47
48
49
50
51
52
53
54
We can see it in action in this video (opens new window)
Seems to be working just fine! The volume slider still works and also the play button does its job.
We were able to make a working example that we can control Traktor from the browser with the help of custom MIDI mapping. It is possible to also make it work in the other direction. When I would change the volume in Traktor, we would auto adjust the slider in the web browser. We can accomplish this with a out mapping instead of an in mapping that we configured in Traktor and both can work side by side. We won’t cover that in detail, but worth mentioning.
# Requirement 3: Control the volume with a gamepad.
As we now understand how we can control Traktor via MIDI, we can now use the gamepad API to use our PS4 DualShock. The behavior will be a bit buggy because of the nature of how the Gamepad API works. We need to “poll” the state of the gamepad periodically to check what buttons are being pressed.
Meaning, we might register a button click multiple times or not at all depending on how long we keep a button pressed and based on our “polling” interval. We can avoid this behavior by using RxJs, but I don’t want too much code for our proof-of-concept so I’ll just accept the potential awkward behavior.
We need to connect our PS4 DualShock with a USB cable to our local machine. No special software is required, if you use a mac, check out this tutorial, else Google is your friend. Although they give advice on how to connect it over Bluetooth, use the USB cable approach.
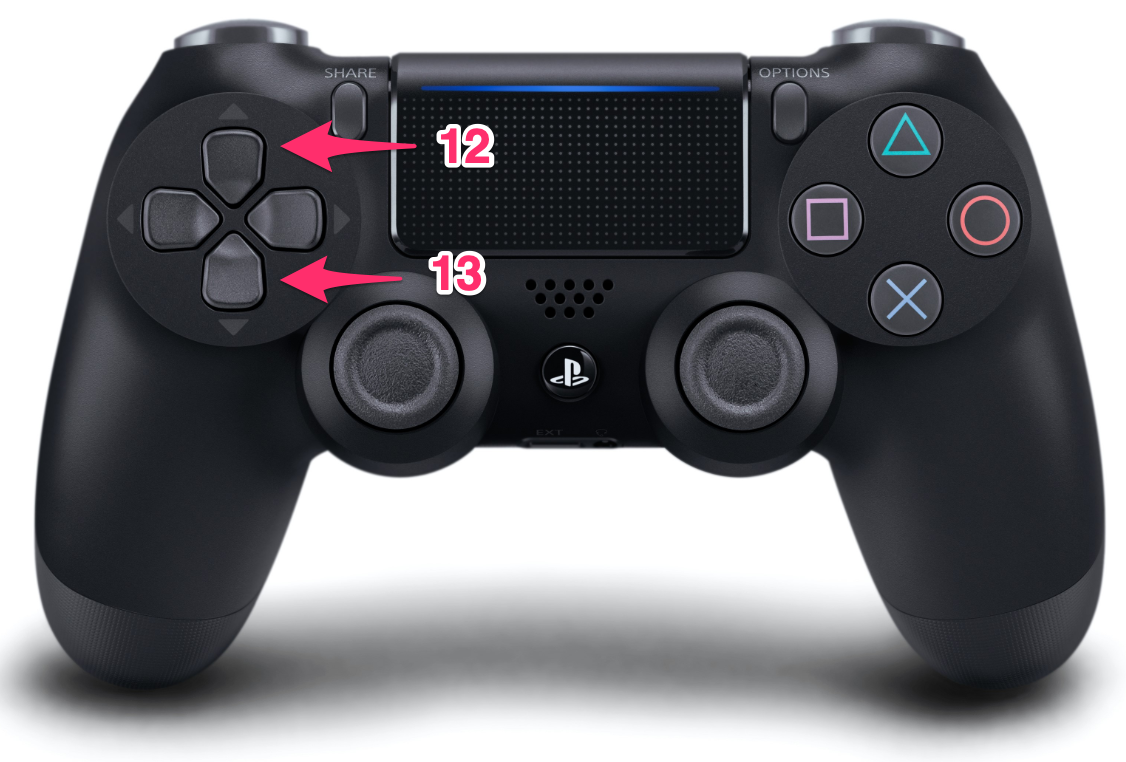
For this example, I’ll use the navigation buttons of our PS4 DualShock. The up button has id/index 12 and the down button has id/index 13. A full mapping can be found here (opens new window).
Here is the code:
<!DOCTYPE html>
<html>
<body>

<script>

    const POLL_INTERVAL = 100;
    const MAX_VOLUME = 127;
    const MIN_VOLUME = 0;
    let currentVolume = 0;

    setInterval(getButtonsState, POLL_INTERVAL);

    async function getButtonsState() {
        // We can connect up to 4 gamepads at the same time
        // By default our single gamepad will be available at index 0
        const gamepad = navigator.getGamepads()[0];
        if (!gamepad) {
            console.log('No gamepad found.');
            return;
        }
        const buttonUp = gamepad.buttons[12];
        const buttonDown = gamepad.buttons[13];
        const midiOutput = await getMidiOutput();

        if (buttonUp.pressed && currentVolume < MAX_VOLUME) {
            currentVolume += 1;
            midiOutput.send([176, 6, currentVolume]);
            console.log('Registered a button up, increasing volume');
        }

        if (buttonDown.pressed && currentVolume > MIN_VOLUME) {
            currentVolume -= 1;
            midiOutput.send([176, 6, currentVolume]);
            console.log('Registered a button down, decreasing volume');
        }
    }

    async function getMidiOutput() {
        // If you use "MIDI Monitor" use as name "'MIDI Monitor (Untitled)'"
        // If you use Traktor use as name "Traktor Virtual Input"
        const midiOutputName = 'Traktor Virtual Input';

        const midiAccess = await navigator.requestMIDIAccess();
        for (const output of midiAccess.outputs.values()) {
            if (output.name === midiOutputName) {
                return output;
            }
        }
        return null;
    }

</script>

</body>
</html>
2
3
4
5
6
7
8
9
10
11
12
13
14
15
16
17
18
19
20
21
22
23
24
25
26
27
28
29
30
31
32
33
34
35
36
37
38
39
40
41
42
43
44
45
46
47
48
49
50
51
52
53
54
55
56
I removed the HTML controls/buttons for clarity of the example. At line 12 we start our polling interval which will call getButtonState. This function will get the current state of our up and down button and will adjust the volume accordingly. Notice that we do have to keep track of the current volume level so we know what value we need to send (as the volume is expressed with a value between 0 and 127).
Here is a small video showing our code in action. (opens new window)
Works like a charm! Now let’s move to the final stage.
# Requirement 4: Control Play/Pause with a gamepad.
For the convenience of me being able to film when I showcase the working example, I will use the navigation button right (id/index 15) to function as the play/pause button. We just need to extend the getButtonState function to also register any button presses on it and sent out the corresponding MIDI message.
<!DOCTYPE html>
<html>
<body>

<script>

    const POLL_INTERVAL = 100;
    const MAX_VOLUME = 127;
    const MIN_VOLUME = 0;
    let currentVolume = 0;

    setInterval(getButtonsState, POLL_INTERVAL);

    async function getButtonsState() {
        // We can connect up to 4 gamepads at the same time
        // By default our single gamepad will be available at index 0
        const gamepad = navigator.getGamepads()[0];
        if (!gamepad) {
            console.log('No gamepad found.');
            return;
        }
        const buttonUp = gamepad.buttons[12];
        const buttonDown = gamepad.buttons[13];
        const buttonRight = gamepad.buttons[15];
        const midiOutput = await getMidiOutput();

        if (buttonUp.pressed && currentVolume < MAX_VOLUME) {
            currentVolume += 1;
            midiOutput.send([176, 6, currentVolume]);
            console.log('Registered a button up, increasing volume');
        }

        if (buttonDown.pressed && currentVolume > MIN_VOLUME) {
            currentVolume -= 1;
            midiOutput.send([176, 6, currentVolume]);
            console.log('Registered a button down, decreasing volume');
        }

        if (buttonRight.pressed && currentVolume > MIN_VOLUME) {
            midiOutput.send([176, 7, 127]);
            console.log('Registered a button right, toggling play/pause');
        }
    }

    async function getMidiOutput() {
        // If you use "MIDI Monitor" use as name "'MIDI Monitor (Untitled)'"
        // If you use Traktor use as name "Traktor Virtual Input"
        const midiOutputName = 'Traktor Virtual Input';

        const midiAccess = await navigator.requestMIDIAccess();
        for (const output of midiAccess.outputs.values()) {
            if (output.name === midiOutputName) {
                return output;
            }
        }
        return null;
    }

</script>

</body>
</html>
2
3
4
5
6
7
8
9
10
11
12
13
14
15
16
17
18
19
20
21
22
23
24
25
26
27
28
29
30
31
32
33
34
35
36
37
38
39
40
41
42
43
44
45
46
47
48
49
50
51
52
53
54
55
56
57
58
59
60
61
62
If you have a look at the code, just minor changes were done. On line 24 we also get the navigation button right and on line 39 we send the corresponding MIDI message. Now we can see this all in action in the final video (opens new window).
You might notice that the “play/pause” sometimes “stutters”, so it pauses and resumes immediately again. This is an example of what was mentioned before, this is because of the nature of the Gamepad API that we “poll” for the status of the buttons and my interval being too fast, so we register a button press twice in a row.
Today we managed to control Traktor from our web browser and even through our PS4 DualShock using the latest browser Web APIs. The code snippets are far from ideal implementation-wise but they give us a solid example that all these technologies can work together. I creating a more solid implementation on my website, WebApiStudio.com (opens new window) where you can find also other interesting “debuggers” and information regarding the used technologies in this article.
# Summary
Today we learned and showed that we the new browser web APIs provide a wide range of engaging opportunities. From this proof of concept, we can go further and control with an input (like a gamepad) our music software, and even actual music instruments that use MIDI.